Softpencil Customer Blog Hop!

Welcome to Softpencil Anniversary Blog Hop! if you are comming from Carole, you are on the right way, if not, why don´t you join us and start at Softpencil blog?

To participate on this blog hop we have to create something using a Softpencil image. This is my project
it´s a gift box, where you can put candies, chocolates or a pretty something for a loved one...
I used Come to my apple home from Softpencil (Elizabeth). The apple is printed twice (one a mirror image of the other) on pattered paper from Jaime, cut out and layered on red cardstock.
I trimmed the red cardstock around the apples with decorative scissors. The windows and doors I first printed them out on cardstock, added glitter with the help of double sided adhesive paper (I love it Lynne, thank you!!!) and glued them on the apples. To finish I added some tiny punched flowers and green glass seed beads.
The cute little worms, as well as the butterflies, are pinted on cardstock with different sizes and colored with colored pencils. I attached the worms with foam tape and the butterflies with beading wire (I strung it around a toothpick before attaching it on the back of the butterflies). I made the grass with scrap strips of green paper, cut with scissors and glued them to the interior of the box.
Making this was so much fun!! it was like solving a tiny living puzzle, where you can add as many details you want and modify your original idea as you go. Here are the rest of pictures I took from different views, click to enlarge them if you want to see their details

I hope you enjoy this as much as I did while making it! thank you for stopping by!!
Now is your turn to hop onto Pauline´s great blog!

If you get lost here is the complete list of participants:
Starting at Softpencil's blog http://digitalstamps.blogspot.com/
 
Ileana   http://allthingsthatmakemehappy.blogspot.com/ ------------------ YOU ARE HERE!

Michelle Perkett Studio Challenge #31

This week at Michelle Perkett Studio Challenge blog we want to see circles and lace/ribbon on your project!
I made a purse card (you can find the tutorial here) by dressing a lunch paper bag.
The image I chose always inspires me bright colors, this is my first time making a yelow card! I used Pincess Lotus from Michelle Perkett (her Etsy shop here), colored it with colored pencils and cut it in a circular shape.
I applied dots of pearl paint on the centers of the flowers, the dots of her dress and on her forehead, glittered around it and attached it to the fron tof the card with foam tape. The circles are glittered around as well before I attached them to the card.
Papers and ribbon are from my stash, I had them for a long time but I never use them before, shame on me! For those who are members of PCP ning ring there is a wonderful article about using all the patterned paper you buy, there are so many good ideas that could be helpful, and I´m putting myself into using them at least in one project a week. If you are not a PCP member yet, please join us, there is so much fun going on there!
Since is a treat purse card I put the sentiment on the back of it: a little piece of Mahatma Gandhi´s wisdom
Hope you like it and I hope I inspired you enough so you can make use of this idea.
Now is your turn to show us your cirlces!

Stop and smell the flowers...

I love flowers, and from time to time I have to remind myself to stop and smell them...
Flowers galore is the challenge at Michelle Perkett Studio Challenge blog. I used Happy Easter Bunny from Michelle Perkett (her Etsy shop here), colored with colored pencils and I stitched orange seed beads on the centers of the flowers and on the bunny belt, and to finish I applied blue eye shadow around the image
The papers are digital papers from Summer Driggs I printed out on cardstock. After I glued the image to the card I applied dots of purple pearl fabric paint around it like a frame.
I cut the flowers with my cricut machine, flip them back and curled them a bit, layered a smaller flower on top of the larger one and stitched an orange seed beed on its center.
Then I wrote the sentiment on scrap of paper, cut it in a flag-like shape, curled it before gluing it to the front on the card and I embellished it with another flower.
Don´t ask me why but I just realized I used the same purple cardstock on the card I used this image for the first time here...

Michelle Perkett Studio Challenge #29

This week, at Michelle Perkett Studio, we are challenging you with a technique: distressing
On a base soft pink card I stitched with pink embroidery floss a piece of craft paper that I crumpled and torn the edges. Once it was stitched I distressed the paper with chesnut brown chalk inkpad.
Fire is the gorgeous Michelle´s image I used to make this card and it´s colored with colored pencils as usual. After that, I cut it around the border and saved the sentiment for later.
I cut a piece of patterned paper and punched tiny holes so I could thread a piece of yute that I knotted the ends. After this, I layered it to the front of the card and made a charm to hang it from the knot with some wooden and glass beads. Finally, I cut around the words of the sentiment and glued it to the fron tof the card.
The image is attached with dimensional tape.
This is my first time using this distressing technique, and because I never did it before I had to looked for it. So, I googled it and it´s amazing all the ways you can distress! I hope I inspired you to try this technique and maybe you can come up with your own distressing technique! We´d love to see your entry this week. Please come, join us and have fun!

Miles apart...

Miles apart but close in heart...
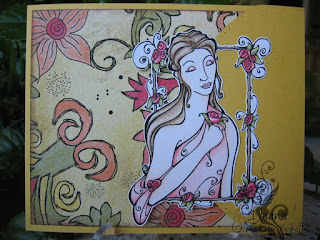
this is a flap card, you can find the tutorial here. I made it to participate in Michelle Perkett Studio Challenge blog, this time we have to make something for Mother´s day.
I used Summer from Michelle Perkett and colored it with colored pencils, cut it and glued it to the flap of the card.
this paper is so beautiful! is a digi paper I printed out on cardstock but I can not remember who made it, if you know who please let me know and I´ll give credit of it. I also pierced all the borders of the flap as it was in the tutorial. And on the inside I´ll write "Miles apart but close in heart" in spanish to send it to my stepmom, her birthday will be in a few days, hope she likes it!

Just breathe...

My second post today! whoo hoo!!

On our last visit to Toledo we stoped by Lladró store and they had such beautiful porcelain figurines in white porcelain... So I used them as inspiration. I made something to frame it and have it near me so it reminds me from time to time to just breathe...
I used Just breathe from Michelle Perkett, her body was colored with colored pencils, her tail is colored with silver colored pencil and added some glitter glue.
I printed the flowers on the back of silver paint chips, cut them, curled them and glued pearl glass beads on their centers. I applied old silver glitter glue around the flowers. I painted her hair with pearl paint and added some dots here and there.
 After I had my image all colored and dry, I cut it and layered it to a silver piece of paper. I pierced around the image and around the silver paper. The iridescent glass beads were stitched with pale lilac embroidery floss.

Door hanger and apple cake

Almost 2 weeks without posting... too much work, and little energy left to do it...

A few weeks ago we were cellebrating 300 members at Michelle Perkett´s group at PCP. Lynne set a challenge to make a door hanger as part of the cellebrations.
I couldn´t make it on time, but I made one anyway because the idea was great! thanks Lynne!! you are so creative...
 For this altered CD I used two Michelle Perkett´s images: Dream dragonfly and Summer. I colored them both with colored pencils. The papers are from my stash (cardstock) and Summer Driggs (patterned). I cut the papers with my cricut machine, layered them and stitched them following the contours, and in the inside circle I stitched some red glass beads. I twined a black bead wire around a pencil to make the handle where to hang the door hanger, and to finish it I write some words first with markers and then with fabric paint to stress them.

Last weekend I baked an apple cake I wanted to share. This is a simple cake, delicious if you take it still warm and it´s good as it is. And most important, you won´t have to worry about how to store it because there won´t be any leftovers!
The ingredients are simple and only the basic ones are needed: (use always the same measuring cup) put in a large bowl 2 cup all purpose flour, 1 cup white sugar, 3 teaspoons baking powder and a pinch of salt, mix it all and cut 2 sticks of cold butter with a fork or with the tip of your fingers until it resembles coarse sand.
Now you put it into the fridge to chill it a bit until you prepare the rest of the ingredients. In another bowl beat 1 egg and mix in 1 cup of milk, set this aside. Now turn on the oven at 350°F and prepare the pan by buttering and flowering it (I used 9x6 in pan), or butter the botton and sides of the pan and put a piece of parchment paper on the bottom and butter it again.
 
Take 4 medium apples (I use whatever apples I have), peel them, uncore them and slice them not to thin. Now you have everything to set you cake: put 1/3 of your flour sand-like mixture on the bottom of the pan, distribute it evenly but don´t press it. Put on top a layer of half the sliced apples (see the picture), you can sprinkle a bit (but not to much) of powdered cinnamon. Now add another third of the flour mixture and repeat the layers: apples, cinammon and finishing with a layer of flour mixture. Lastly, pour the milk-egg mixture on top of the cake and take it to the oven. Bake it until it turns golden brown, about 30-40 min. This cake gets better everytime you make it! hope you try this one, you´ll love it!