Write a story...

and share it with your friends!
I altered this notebook for my daughter, she likes to write and I thought this would be a nice gift for her now that a new school year is approaching.
the image is Stella the summer story teller by Michelle Perkett (you can find it here). Coloring this too-cute image made me spend a wonderful time, I used almost all my coloring mediums: colored pencils, crayons, oil pastels, chalks and eye shadow; some parts are blended with gamsol, some with mineral oil and others without blending. I matted the image with patterned papers and doodled a line around them like a frame, I was not careful at all while drawing them and I think they go good with the image.
the sentiment is hand written on the patterned paper with gel pen. The papers are from Summer Driggs, you can see her wonderful work here. I hand cut a scalloped border on the orange paper and I traced it with gel pen also. The faux stitching is a rub on I had for ages. And I finished the notebook with a flower made out of the DP (a left over flower from this project!). It´s a simple decoration but I didn´t want to add anything too bulky or something that could be easily broken, I want my daughter to use it and share her stories.
Hope you like it!
I´m playing at:
Pollycraft Monday Challenge #59: add a little nature
Cupcake Craft Challenge #106: let´s get digital
Digital Tuesday Challenge #74: make a gift set
Flutter by Wednesday Challenge #119: anything goes with a butterfly, fairy or angel

Back to school!

That time of the year again!! Loved all my first days of school, even at college they were special to me, all the expectation, new pencils, new notebook pads, sometimes new friends, new teachers, new things to learn... I made this card for my daughter´s first day of school, I hope she likes it! I´m also preparing some other goodies for her to open after school, I´ll show them as I finish them.
I took a plain craft card and rounded the corners, then I followed Clean & Simple sketch #101 (I used it before here), after that I rummaged my stash of scraps and found those I used to make last year´s first day of school card too, but I still like them a lot so I decided to use them again. Paper and row of pencils are part of a blog train I followed last year (couldn´t find the files to give credit of them). And slowly the sketch turned into a pencil box (not my original idea at all!!). Took a strip of craft paper and cut with edge scissors, I added some rhinestones to glitter it up a bit and hand wrote back to school! with gel pen. To make the shadows around the box and pencils I used my dark brown make up that I rarely use on me because is too dark for my skin... love the effect here.
The image I used is Mary Margaret, teacher´s pet from Michelle Perkett (her Etsy shop here) that I colored with colored pencils (and only blend them on the skin parts with mineral oil), I cut Mary and place her on the card with foam tape, to finish it I added a rhinestone on her bow.
Pretty simple but I like the result, hope you like it too! I´m participating at:
Michelle Perkett Studio challenge #42: back to school
Little Red Wagon challenge #43: back to school theme

Beauty

I had a tiny piece of brown cardstock that was screaming to be turned into a bookmark, and that´s exactly what I did fulfilling its wishes (the size of the finished bookmark is 1.75x4 in).
I used (again) my patterned paper made out of paper napkins and scraps of paper that I distressed a bit with chalks. I gave some shape to the fold of the bookmark with edge scissors, to finish it I tied a piece of brown ribbon with a knot around the front and glued some glass seed beads.
The image is Bird on branch from Glitterbabe colored with colored pencils, embellished with glitter, cut and placed on the front with foam tape. On the tip of the branch I added a sakura flower (cut from the patterned paper).
On the back I hand wrote an inspirational quote from Confucius with gel pen and glued a piece of the same brown ribbon.
I´m playing at the following challenges:
Glitterbabe´s Challenge #9: Asian
One Stitch at a Time Challenge #28: girly
Bee Crafty Challenge #37: anything goes
Cute Card Thursday Challenge #127: dieing for a punch!
Aly´s Sunday Challenge #24: pretty in pink

Tulips for you


Since I saw this image I had in mind using it with felt. This is a freebie from Patti Moore of Pholkart Blessings. She has wonderful images, and when I look at them they inspire me something more than a colored image.
I took the image and printed it out on white printer paper, cut each part separately, place them on the felt and cut the directly each piece three times. I stitched a button from my stash on the tulip flower with pink embroidery floss, and decorated the leaves with some simple stitches of green floss.
Then I took a page from an old book and turned it into a folded ribbon and I distressed it with chalks.
When everything was ready I assembled the card in no time, starting with a craft card as base I glued a scrap of paper for the background, with double sided tape I placed the flowers and leaves, glued the stems and took another bit of the double sided tape to place the "ribbon" onto the card. I finished it all with some raffia that I tied into a bow.
I love how it turned out!  I´m making more of these they could be a great for mothers day, spring, b-day... so many possibilities...

Dancing...

What a beautiful image from Isabella´s Sketchbook! This is Elizabeth Ballerina colored with colored pencils and blended with gamsol.
I used all scraps to make this tiny card (it´s 2x4 in!), even the embroidery floss I used to stitch the glass beads is a scrap. The green border I took it from an old card, it was completely off there, I think it looks much more better here... Recycle, reduce, reuse!!
I´m joining the following challenges:
Isabella´s Sketchbook challenge blog: scraps!
Digital Tuesday challenge: butterflies and/or lace
Cupcake Craft challenge blog: lace
Creative Inspirations challenge blog: recycle

What a lot of fun I´m having these days... thanks everybody for the wonderful challenges!!

Happy day!

Isn´t this image gorgeous?!? It´s Camile from Michelle Perkett (her Etsy shop here)
It deserves a front view too!
I was cleaning up my craft room this morning and I found (again) some old papers that I still like and I wanted to used them today... and hopefully tomorrow! so you´ll be seen them very ofter from now. I still think they are pretty papers, very out of fashion but pretty. Ribbon and lace are from my stash.
I colored the image with colored pencils and blended them with mineral oil, cut it and added dots of pearled paint before placing it to the card with foam tape.
The sentiment is a very old clear dollar stamp I stamped twice (straight and upside down) on a scrap of paper, cut around it and matted it with a scrap of the cardstock used for the card base. I painted two dots of pearl paint before attaching it to the front of the card with foam tape.
I´m entering this card in the following challenges:
Aly´s Sunday Challenge: under or by the sea
Truly Scumptious: old stamp in my case
Sentimental Sunday´s: anything goes
Cupcake Craft: lace
Digital Tuesday: butterflies or lace
Party Time: anything goes

Wherever you go

go with all your heart...
A very simple card, the ones I love most! I started with acetate that I cut and folded into a card. I took a piece of handmade patterned paper (made out of paper napkins following this technique) and matted it to a scrap of brown cardstock before attaching it to the inside of the card.
I colored this gorgeous butterfly from Softpencil with colored pencils, cut around it, curled its wings a bit to add dimension and placed it on the front of the card. I cut a few flowers from the patterned paper and adhered them also to the front. To make the sentiment I cut two strips of paper from an old book (I liked the yellowish color of the pages) one with half of the sentiment for the outside and the other one with the rest of it for the inside.
Hope you like this one because I love it!
I´m participating at:
One Stitch at a Time Challenge blog: mystical
Digital Tuesdays Challenge blog: butterflies or lace
ColourQ: #45
Flutter By Wednesday´s challenge blog: open challenge
Crafty Creations challenge blog: winged things
Creative Cottage challenge blog: acetate

Just for {U}

I made this envelope trying to follow ColourQ #44, I loved the combination of colors and I think I used them very well (I made use of my scraps of paper!). The sad part is that I couldn´t make it on time to participate on the challenge... maybe next time...
Over a strip of black cardstok I glued three scraps of paper, paper pierced them and stitched some clear glass seed beads with black embroidery floss. After that I trimmed the long edges with decorative scissors and placed it on the front of the envelope. The sentiment is hand written on the light blue paper.
The image if from Daisy May (Woopsi Daisy), a fairy I bought a few months ago, these images are so cute! and so beautiful to color. I used colored pencils and blended them a little bit with mineral oil and to finish it I painted her wings with pearled acrylic medium (and I also slightly brushed some of it over her dress). I cut the image and placed it on the envelope with foam tape.
I´m joining Flutter by Wednesday´s challenge blog: #117 and Crafty Creations challenge blog: #80

You warm up my {heart}

I wanted to try a new technique to color the images: crayons and oil pastels (you can find an awesome tutorial here). So, my guinea pig was with this cute cup (Cuppa Tea from Meljen) but instead of tea I wanted it to have a soup, my favorite one: broccoli soup.
I loved this new technique!! but I messed up around the image, so I cut it out after I finished coloring it and layered with a scrap of red cardstock, and because I have to cut out the rest of the image (not my original idea though...) I tried to resemble the original image adding some doodling and stickers directly to the patterned paper. I placed the image to the card with foam tape for dimension.
The patterned paper is from Summer Driggs I cut and glued to the front of the card (cardstock from my stash). The sentiment is from Jaime that I faux stitched and added another heart sticker.
And this is how I ended up with a clean and simple card following Meljen Design Team Challenge blog challenge #19

Pretty colors

I love the color combo that Glitterbabe´s Challenge blog set this week: pink, purple and black. I started by coloring the image
it´s Wheelbarrow from Glitterbabe that I colored with colored pencils and cut out using some card wiskers found here. I matted it with a scrap of purple patterned paper from Summer Driggs and place it with foam tape on a another piece of pink paper (from Jaime) that I previously glued to a black card.
I stitched glass seed beads around the pink paper to add some sparkle and embelished the card with a flower cut with a cricut machine to which I stitched a button and tied a piece of ribbon from my stash. The inside is decorated with another piece of pink paper but instead of stitching glass beads (too bulky for the inside...) I painted dots of purple paint.
I hope you like this simple card, it took me a bit more of time due to the stitching but in general is a very simple card. This card turned out better than I thought!
This card was made following Glitterbabe´s Challenge blog challenge #6.

A sweet day

yesteday I woke up with the need of coloring one of those cute Bugaboo images and to make a card using one of the sketches I had on my notebook for such a long time that I don´t recall where I saw it (if you do, please let me know and I´ll give credit of it).
The DP is a free digi from Daisy Company Four Seasons backgrounds. I love how summery it looks. Before printing it out I digitally placed a TlcCreations sentiment. Once I glued it to the front of the card, I cut a circle and stitched some yelow glass seed beads with embroidery floss. I love to stitch my cards, it always gives me a quiet time that brings nice memories and makes me think of my mom (maybe because she taught me to do it?). To finish the front I ruffled a piece of red ribbon from my stash.
 This cute image (Summer Butterfly Bears - Ice cream) was colored with colored pencils and added glitter on the strawberry flavored ice cream.
On the inside I stamped one my old clear stamps, I love those flowers but I don´t know why I don´t use it more often... Instead of coloring the flowers I glittered them and added some tiny dots of pearled paint. I placed the image with foam tape and another piece of the same red ribbon.
This card fits the following challenges:
Catch the bug Challenge blog: sweet sweet summer time
Rosie-D´s Challenge blog: all creatures great and small
One stitch at a time Challenge blog: sketch or little pink on your project
Party time Tuesdays: summer birthday card
Truly Scumptious: golden oldie

A thank you card

Yesterday late afternoon (on my time zone) Paulette from TlcCreations set a 24 hours challenge, and she offered a beautiful image we needed only to color to participate.
I printed it out right away and I thought leaving it to color the following morning, but it was so beautiful that I couldn´t help myself and I finished it yesterday night. Today I made a card with it
this is my first time making a vintage looking card, or as vintage as I could get up to know! and I love the result! really...
These are the image before and after
I colored it with colored pencils, cut in a round shape and layered it with a piece of the base cardstock, distressed the edges and added dots of glitter glue.
I used a digi paper leftover (I used it before here, and I still can´t remember who made it...) that I distressed with ink, a ruffled lace I had for at least 4 years (!!??!!) and a ribbon I bought this morning specially for this card because I didn´t have any to match.
The sentiment on the front is from Sueli Colbert Designs and I printed it out directly on the card
and I added two dots of glitter glue paint.
I made the inside too!
because Paulette has also a wonderful sentiment that goes perfect with this image.
I´m participating with this card at Digital Tuesdays Challenge blog where we have a technique challenge: distressing, at Cupcake Craft Challenges blog where we have to use two digis from two different designers, and at Sentimental Sundays Challenge blog where the challenge is to switch it up: new technique or new style.

I Love U

isn´t this image sweet!?! It´s Crystal and belongs to Clip Art and Scrap (you can find it at My Grafico). I made this card for my sweetheart because yesterday was our anniversary, 4 years together (where did the time go?!) and I must say I´m a lucky person, life gave me a second chance and I was able to find a person who cherishes me as if I were a treasure. He deserves more than this but it was made just for him and that makes it special as he is.
I used papers from my stash, the patterned paper is a gift wrap double sided paper I found in a gift shop sometime ago and I fell in love immediately but for some weird reason I didn´t used until now... and I´m so glad I did!! it´s a gorgeous paper, full of color and shapes. I followed Clean&Simple sketch #101. The sentiment is computer generated, after I cut it and placed it to the front of the card I glued some clear glass seed beads on one end and I used a sticker "U" that I put on a piece of cardstock, cut it and attached it to the card with tiny pieces of foam tape. And to finish the front of my card, I pierced the top and bottom of the colored paper.
I colored the image with colored pencils and blended them with gamsol and baby oil. I tried to use two shades of aquamarine for her dress on alternate strips but it doesn´t look like that... I need to improve my coloring in that way. I cut the image and placed it to the card with foam tape.
I did the inside too, this one is special so I needed to do something extra. The sentiment is from Raindrop Echo Designs (found at Sentimental Sundays) and it fits perfectly with what I wanted to say. As a finishing touch I added rhinestones to the dots on the sentiment.
I´m officially on vacations, sooooo.... I hope I can play more!

Aloha DT Blog Hop!

Aloha everybody!! here we are for another fun blog hop hosted by Michelle Perkett. She, so generously as always, gave us another gorgeous image to work with: Leilani.
If you get here from Jan´s blog you are on the right way if not you can go back to the beginning to have fun with us!
And because this is a party I made two cards and a favor box
This set has a invite card, a thank you card and a palm tree favor box. I wish I had more time to finish everything I had in mind, so many ideas but so little time...
For the invite I started with a plane turquoise card, I computer generated and printed the sentiment on a piece of white cardstock and placed it to the front of the card, then I glued green glitter on the Luau word and let it dry before I stitched a piece of acetate I painted some waves and a green border with acrylic paints from behind. I colored Leilani with colored pencils and added lots of glitter to make her sparkle! and place it on the card with foam tape. The flower: I went to the party store and I brought a Hawaiian necklace (those so pretty with flowers) and took three of them, glued them together and made the center with glitter before placing it on the card.

I then took another turquoise card and cut it in half to make the thank you cards

this time I painted the waves (and seagulls) directly on the front of the card with acrylic paint and some glitter glue ont he waves. I took a strip of green wrap paper and folded before placing it to the card. I colored another Leilani and cut it before attaching it to the card with foam tape. I used a piece of ribbon to hide the borders and finished the card with a flower and a tag.

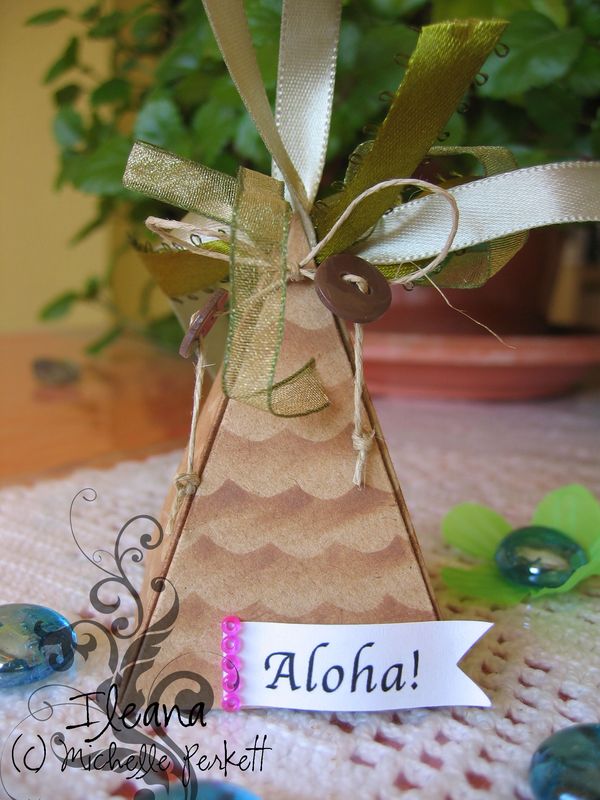
And the last project is a favor box
does it looks like a palm tree? I hope so!!  I used a pattern for a triangular box you can find it here. I printed it out on craft cardstock and sponged it (using a border template I cut with scissors) to make it look like a palm tree bark, I made two holes where I made go through several pieces of green ribbon as if were leaves. I tied the box with bow made of yute and I used two brown buttons as coconuts and secure the end of the bow. I cut the sentiment in a flag shape I love so much and instead of using another button to secure it I glued glass seed beads.
Hope you like this as much as I did making them!
I need to add a few words to the DT members, there is nothing else I din´t say already! shortly, so we can continue with the fun, I feel so glad I was part of this group, you ladies made me grow in many ways I never imagined and I´ll cherish all this time for the rest of my life! you are so talented and the source of my inspiration, thank you so much for that!! and a big thanks to Michelle for the opportunity to be part of her DT, I enjoyed every second, thank you! thank you! thank you!!

Now, hurry onto your next stop, lets see what Jana has prepared for us!


If you get lost along the way here is a list of all blog participating!
Michelle Perkett's Blog:

http://michelleperkett.blogspot.com


Helen:

http://h2designs.blogspot.com


Marilyn:

http://marilynscardsandmore.blogspot.com

Sandi:

http://oneofakindcreations-bysandi.blogspot.com

Tammy:

http://tmaynard.blogspot.com


Maria:

http://joyfulstamper.blogspot.com


Jean:

http://jeano9.blogspot.com


Claire:

http://clairescraftycreations.blogspot.com


Lynne:

http://doodlebuglynne.blogspot.com


Randi:

http://hobby-for-sjelen.blogspot.com


Mari:

http://trailsofpaper.blogspot.com


Linda:

http://cardchallengesandmore.blogspot.com


Shelley:

http://shelleyscreations.blogspot.com


Pattie:

http://pattiescreations.blogspot.com


Lee:

http://stampingwithgrandmalee.blogspot.com


Amanda:

http://colouringourworld.blogspot.com


Pauline:

http://paulineguttrey.blogspot.com


Jan:

http://jans-gonestampin.blogspot.com


Ileana:

http://allthingsthatmakemehappy.blogspot.com ---------> YOU ARE HERE!


Jana:

http://stampingeek.blogspot.com


Tammy:

http://mycraftcentral.blogspot.com


Trish:

http://wwwhillsidecraftscouk-trish.blogspot.com


Denise:

http://myinkimprint.blogspot.com


Jasmine:

http://oysterflowers.blogspot.com


Kerri:

http://fotf-constellations.blogspot.com


Bev:

http://beeceecreativity.blogspot.com


Laralee:

http://racinggrandmacrafts.blogspot.com


Ann:

http://annfran9093.blogspot.com


Margie:

http://creativityplace24.blogspot.com


Rhonda:

http://bluepoohbear753.blogspot.com


Margaret:

http://deniquecrafts.blogspot.com


Michelle Perkett Studio Challenge blog:

http://michelleperkettstudio.blogspot.com