Showing posts with label Allsorts Challenge. Show all posts

kindness

Hello crafty friends! hope you had enjoyed your weekend. I´m here to show you a card you can do in very few minutes with a beautiful outcome.
As you can see is a CAS card, the image is a digi stamp from Floppy latte´s, gorgeous!! I colored it digitally following this inspiration color combo
I stamped the sentiment and added a few rhinestones, as usual it looks better in real life...


I´m showing my card at:
CDAC Inspiration challenge group
Brown sugar challenge #31: greeting
Word art Wednesday challenge #69: anything goes
Allsorts challenge #196: for a lady

thank you for stopping by and have a wonderful week!

Birthday monster!

I had to make a birthday card for a little boy and I thought this Bugaboo stamp could make the trick. The little guy just loved it!
This one is a very easy and simple one: took two pieces of patterned paper and layer them on the front of the card, then I added a rub on stitch at their joint of the two. I colored the image with colored pencils, cut out and placed it on the card with foam tape. And finally I computer generated the sentiment, printed out, cut and placed it also with foam tape (this time I made no mistake while typing the sentiment! whoo hoo!!! ☺).
Thank you for stopping by!

I´m playing at the following challenges
All sorts challenge #156: birthday
Stamp, scrap and doodles: stars and strips
Aud sentiments challenge #55: any sentiment
Party time tuesdays challenge #70: anything goes

A bookmark

front
back
Second post today! whoo hoo!! ☺ I made this bookmark for my daughter. I had this image from A Day for Daisies printed out for ages waiting to be colored.... love it, it´s simply gorgeous! and goes wonderful with the sentiment I placed on the back of the bookmark (from TlcCreations).
I colored the image with colored pencils, I wanted to use shades of purple only (to match the patterned paper I have it on my stash for ages too...), but I added a few touches of pink and glittered the flowers on the mother´s dress. As embellishments just added a few fabric flowers (gift from my sister Dani!) that I decorated with purple sequins and some glass seed beads. Very simple, but I love how it looks in real life!
On the back I layered the sentiment with a punched strip of the same patterned paper, and to make it less bulky I only added the flowers and sequins. Hope you like it as much as I do ☺
Thank you for looking!

I´m playing a the following challenges:
A day for daisies challenge #38: dress it up with gingham
Just some lines challenge: spring cleaning
All Sorts challenge #145: say it with flowers
Paper Sundaes challenge #111: Feminine flair

Just for you

 solo para ti
I finished this envelope today and I wanted to share it with you. Loving the result! I printed directly on the paper envelope, a very fun technique...
I started by opening a PS file of the size of the envelope, I stamped a scroll (a PS brush) in gray and added some touches of a distressing brush and the sentiment on the bottom, when I was happy with the design I printed it out. Then I colored the roses and leaves with colored pencils and added stickles to some of the flurishes.
I took this beautiful bird image (from The Graphics Fairy) and printed it two of them, one the mirror image of the other, cut ehtm out and placed them with foam tape.
I cut with edge scissors the clousure of the envelope and made a flower with scraps of ribbon, glued it in place and voilà! you have a nice, easy, and fast decorated envelope.
 Thank you for stopping by today!

I´m playing at the following challenges:
All sorts challenge #122: keep it simple
Raise the bar challenge #76: things with wings
Alphabet challenge: Q is for quick and simple
Little red wagon: repeat after me
Sweet stampin`: anything goes
Lollipop crafts challenge #49: anything but a card

Gift card holder

Hello my blogger friends, here I´m showing you what I made to inspire you for the POM Thursday challenge at The Outlawz this week (yes, this one is posted on time!). The challege is to make a gift card holder.
I started with a piece of red cardstock and I made a pocket with a triangle in one corner to slip the card. Took a piece of that pretty embossed white vellum paper and layered it with an embossed a tranpsarency sheet (loving my new cuttlebug!). I faux stitched around with a white gel pen and glued black sequins on the corners.
To make the embellishment I took a gold empty expresso coffe cup and crushed it, then I glued a red leather flower and finished it with another black sequin. I also wanted to add a bit of glitter to the gift card, but it didn´t work so well, you can see the right dress in it where I glittered some parts of it, but the glitter stuck to the whole card... so it was kind of messy... but it gave a nice touch anyway...
Hope you like this one and you can join us in the fun this week. And you have to see what the other girls did! you can not miss those great ideas!
Have a lovely day, thanks for looking.

I´m playing at the following challenges too:
Cupcake craft challenge #150: your favorite cupcake challenge (#55 gift card holder)
For fun challenges: one fold
All sorts #111: free and easy July

A tag

Love this pixie, beautiful image! it´s from A day for Daisies and I made this tag to play at their challenge blog. All papers are from my stash as are the embellishments. I started by giving shape to a scrap piece of red cardstock, I used a template I found at Lilly of the Valley place that I modified a bit.
Then I cut a piece of this gorgeous embossed vellum paper and placed it on the tag, and on top of this layer I glued a piece of this gift wrap paper I used as patterned paper. I glued clear sequins around the patterned paper, once it was dry I pierced the holes to stitch light pink seed beads with white embroidery floss.
I colored the image with colored pencils and used mineral oil to blend the wax. Glittered the pixie wings and cut carefully around before placing the image with foam tape on the tag. I finished it with a piece of tinsel that I stapled it to the tag.

I´m playing at:
A day for daisies challenge #8: tinsel and tags
CES challenge #17: anything goes
Allsorts challenge #83: anything goes
Pile it on challenge #48: gift wrapping or tags
Paper sundaes challenge #49: cut it out
Aly´s Sunday challenge #32: anything goes
ColourQ #64
For fun: anything goes

Snowman of ♥Love♥

This card was made in just a few minutes, I´ll try to remember this day next year when I start to make Christmas cards, maybe once in my life I won´t be late!
I opened the image (Snowman Love from Designed to Delight) and sentiment (from Elisa) in PS, open a new file with the dimension of the card and dragged the images in, resizing them to have them in the right position. Took a blank card and printed the file right on the cardstock and voilá! ready to color and embellish!
To color the image I used just colored pencils. Added a bit of decoupage glue on the hearts to give them a nice shiny look, and glittered the snow and the center of the snowflake to add sparkle. This one is for my sweetheart, hope he is not reading this!

I´m playing with this card at:
Delightful Inspiration challenge: December week 3
CES challenge #17: anything goes
Allsorts challenge #83: anything goes
Sweet stampin: celebrations
Fussy and fancy: snow
The corrosive challenge blog #95: non traditional Christmas colors

Wishing peace

Another Christmas card, and I think it´s one of the last I´ll make this year, not because I don´t like them, on the contrary! it´s too late to send them now!!
On to my card again: I used Earth from Michelle Perkett (you can find her beautiful images here) that I colored with colored pencils, some parts are blended with mineral oil. I added dots of white pearl paint on the centers of the flowers and a few green rhinestones.
I pleated a piece of red ribbon to embellish the front of the card and attached the image with foam tape. The base of the card is an opaque acetate sheet (those you find at office supplies to bind sheets) I saved from the bin (again!) at work. I added clear stickers to write the sentiment.
On the inside I glued the patterned paper, it´s a very festive gift wrapping paper, loved the colors! I cut the borders with edge scissors and added the sentiment (from Elisa) with foam tape too and a bit of the same red ribbon. And that´s it! simple but I like it a lot too ☺

I´m playing at the following challenges:
Michelle Perkett Studio challenge blog: have a merry little Christmas
Creative Belli challenge #106: Christmas embellishments/papers
Stamping for the weekend challenge #53: Christmas
CES challenge #17: anything goes
Allsorts challenge #83: anything goes

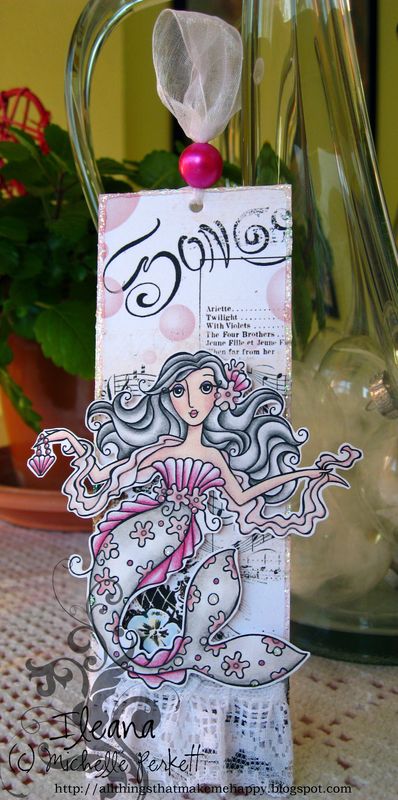
Mermaid song...

Michelle Perkett Studio Challenge blog this week is challenging us to use a tag on our projects, and they gave me the excuse to make this tag/bookmark using this gorgeous image: Eva the glam mermaid by Michelle Perkett.
I colored the image with colored pencils blended with gamsol and added dots of crystal glitter on some of the pearls of her "dress". I placed the image on the tag with foam tape for dimension.
The paper I used is from a very talented lady Julia van der Werf, I cut it in half and glued each one on each side of the tag, so I have the same paper on the back where I left a place to write a personalized sentiment. I added  a ruffled lace ribbon, made a hole on the top, tied a piece of sheer ribbon with a big pink bead (all from my stash) through it and finished the tag with crystal glitter glue.
A very easy, quick and simple one! hope you like it!!
I´m playing with this tag at:
Michelle Perkett Studio Challenge #46: tag you´re it!
Creative Inspirations Challenge #43: pink and black
Totally Paper Crafts Challenge #35: a kind of magic
Little Red Wagon Challenge #47: glitter
Allsorts Challenge #71: plain and simple