Showing posts with label Little Red Wagon. Show all posts

Thank you {FRIEND}

Hello my dear blogger fiends! we are having a HUGE party at The Outlawz this week!!! lots of prizes and plenty of fun and inspiration for everyone. You don´t want to miss it!!
Here I´m showing my inspirational creation for our group Twisted Thursday at The Outlawz, we want you to use: red, yellow and green on your creation. And these are what I made! two tiny cards that turned out better than I thought ☺
Can you find the differences??? there are not so many....and this is how I made them: I took scarps of my so loved hanging paper folder and cut them with my cricut, I layered them on a very (very) old paper from my stash that happened to have those gorgeous warm fall colors. Then I took a scrap of an embossed vellum paper and punch it with that pretty lace border punch (from MS) and I stamped "FRIENDS" with brown ink on another scrap of paper, glued them together on the front of the cards and added a few details to it: a couple of buttons (from my stash too), faux stitching with white gel pen and a tiny tag (also cut with my cricut). I saw the card too plain at this stage, so I took one of those (also beloved) expresso crushed cups and glittered them with chunk glitter, I ruffled a piece of fabric and placed it behing the cup. I wanted also to add an image, so I colored that cute pumpkin (from Tiddly Inks) with colored pencils and placed it with foam tape on the cup for dimension. My green was missing!!! well, not quite, but a tiny leaf was not enough green, so I glittered two pins ($ store ones) to finish the embellishments of the cards. Lots of tiny details that kept me entretained one afternoon. Hope you like them and play with us.
Thank you for stopping today!

I´m playing at:
Simply create #53: older tham 6 mo.
Little red wagon #101: thanks
Totally paper crafts #86: autumn
Paper Sundaes #89: lots of layers
Cupcake inspirations #130

Just for you

 solo para ti
I finished this envelope today and I wanted to share it with you. Loving the result! I printed directly on the paper envelope, a very fun technique...
I started by opening a PS file of the size of the envelope, I stamped a scroll (a PS brush) in gray and added some touches of a distressing brush and the sentiment on the bottom, when I was happy with the design I printed it out. Then I colored the roses and leaves with colored pencils and added stickles to some of the flurishes.
I took this beautiful bird image (from The Graphics Fairy) and printed it two of them, one the mirror image of the other, cut ehtm out and placed them with foam tape.
I cut with edge scissors the clousure of the envelope and made a flower with scraps of ribbon, glued it in place and voilà! you have a nice, easy, and fast decorated envelope.
 Thank you for stopping by today!

I´m playing at the following challenges:
All sorts challenge #122: keep it simple
Raise the bar challenge #76: things with wings
Alphabet challenge: Q is for quick and simple
Little red wagon: repeat after me
Sweet stampin`: anything goes
Lollipop crafts challenge #49: anything but a card

A little note...

Today we started a new challenge at The Outlawz Twisted Thursday. This week we are challenging you to create something using puches or dies and this set of little cards are my inspirational creation for you.
I cut the mushrooms with my cricut machine and I used both the positive and negative image to make two cards out of one cut.
The cards are very simple (yes... I´m still on the CAS mood...) and I tried for them to be easy to make because I really wanted to make a set. This is my first one and it only has four cards but the number of them can be easily expanded, it took me no time at all to finish it!
Behind the images I placed clear tape and glittered over with a very thin glitter, it sparkles a little and it´s still transparent enough to see the patterned paper on the back. I placed the shrooms on the front of the cards with foam tape and finished them by stamping a sentiment in a corner and tying a piece of sheer ribbon. Hope you like them ☺
Thank you for stopping!

I´m playing at:
Catch the bug challenge: anything goes
Ladybug craft ink TLT challenge: anything goes
Delicious doodles challenge #1: fresh start
Little red wagon challenge #97: use die cuts

Feliz Día!

Today is Mother´s Day here in Spain, and I made this simple card for my MIL. The base of the card is shimmering cardstock, so beautiful! sadly I can not show you this with a picture...
The flowers are left over flowers from my niece´s birthday place cards (see this post) that I put them in place with hot glue.
As I said, this one is a simple and quick card, as details I added a couple of dollar store leaves, ruffled a piece of sheer ribbon, a hand written sentiment, and ended the card by punching the bottom border.
I´m playing at:
The Outlawz Greetings challenge: anything goes
Little red wagon challenge #74: for Mom
Stamp, scrap and doodle saturdays: Mother´s day

Thanks for stopping, have a great day!

{LAVA} U!

How cute is this image??!! it´s Lava lamp from Glitterbabe (check out Stef´s art shop here!) This card is very simple and here is how I made it: I colored the image with colored pencils and blended them with mineral oil. I wet my fingertip with glue and touched slightly the image, then sprinkled glitter on the lava to add sparkle! Cut the image around and placed it on the card with foam tape.
Then I took a scrap of paper to stamp the sentiment with alphabet rubber stamps (from Image Tree), cut one end and curled it a bit before attaching it to the card.
The flower is made with a piece of an old ribbon I had on my stash that I ruffled by pulling at the white thread on one side, tied it with a knot on the back and glued it to the card, then I attached an iridescent flat bottom pearl on its center. And that´s it!

I´m playing at:
The Outlawz at their Sunday´s Clean and Simple group: Recipe -> color Red and one embellishment
The shabby tea room challenge #45: white and bright
All that scraps: early valentine ideas
Little red wagon challenge #64: one layer wonder
For Fun: everything glitter

Merry and bright

I´m trying my best not to be too behind my Christmas cards, not an easy task! but here I have another one to share with you.
These two stamps Hanging ornaments and Holly leaf are from Glitterbabe (you can find them at Stef´s store here!), I colored them with oil pastel and blended them with mineral oil. After I finished coloring the ornaments I painted completely with my so loved glittered nail polish and added details with gold glitter glue. On the holly leaf I glittered the border and painted the fruits with glitter nail polish. I really like the effect of the nail polish, it doesn´t saturate the image with glitter. I placed the images with foam tape, I drawn the ornaments strings  and the sentiment with gold gel pen. The black cardstock is perfect when you want to highlight the images. The simple sketch is from Clean & Simple sketch #115, love it!

With this card, I´m playing at the following challenges:
Little red wagon: do it in 3´s
Cute card Thursday challenge #138: anything goes
Sunday´s with Crissy #11: red, gold, green
Woopsi Daisy Challenge: it´s Christmas
Cupcake Inspirations challenge #85

Celebrate cupcake

Friday again!!! whoo hoo!!! tomorrow I plan to spend my whole day crafting, I´m so looking forward to it! But for today is my turn to inspire you, this time with another card I made for the daily inspiration that awaits you every day at 2 Cute Rubber Stamps.
There is a freebie and a challenge awaiting for you there! please join us! you have until 31st of October to submit your creation and the possibility to win a rubber stamp!
Back to my card,
I colored the image (a freebie you can find here) with crayons and blended the colors with mineral oil. Look at the sparkling frosting, does it look great?!! I made it with white puff paint and glittered it before it dried, once it was completely set I puffed it and that´s the wonderful result, it look much much better in real life! the image is placed on the card with foam tape for dimension.
I keep this one simple too because wanted the 2 Cute cupcake to be the focus. This is the first time I´m using a doily on my cards, I colored it a bit with chalks and embellished it with green rhinestones. I stamped the sentiment on a scrap of paper and folded it on a flag like shape before attaching it to the card. I like this card, it´s simple, easy and looks beautiful, hope you like this one too!

I´m playing at:
Little red wagon Challenge #50: something old, something new (the oldie here is the cardstock, I had it for ages!!)
My grafico challenge #70: anything goes

A calendar for {MOM}

The third Sunday of October (the 17th this year) is Mother´s day in my country. I made a calendar to give as a present on that day.
I´m using Thanks Mum from Michelle Perkett, I colored the image with colored pencils (and blended with gamsol the skin parts) and placed it on the calendar with foam tape. I added glitter glue on the child dress and glued some blue glass seed beads on the mother´s dress.
The calendar was computer generated, I used Stamp III from Sueli Colbert and I made a flower with some tulle, felt, paper flower and glass seed beads, and I finished it with a heart pin. I pierced around the calendar with a thin needle and draw a heart with pencils on the 17th to highlight the date.
here is a front view to show the last details: rhinestones on the calendar flower swirl and glitter glue to framing it.

I´m playing at the following challenges:
Michelle Perkett Studio Challenge #47: girly with bling
Little red wagon Challenge #48: make your own embellishments
The creative Cottage #24: bling it on
Catch the bug Challenge: anything goes
Stamp, scrap and doodle: open challenge

Happy Birthday!

Happy birthday...
happy birthday...
happy birthday to me!!!
Yep! it´s my birthday today, and NOPE I´m not telling how old I´m now!
It´s very easy for me to think of presents for everybody but I had always a hard time to find something for me, so I made myself this envelope where I put some money as a self-gift and I told to myself to spend it without regrets!
This cute image is Ratiny in a cupcake from Softpencil, Elizabeth has such beautiful images at her shop, you should go and see for yourself, they are completely cute! I started by decorating the envelope using some old patterned papers from my stash that I faux stitched around them with fine markers. Took a brown ribbon and I tied it with a bow, a scrap of the same ribbon and a button are the decoration of the closing.
I printed the image twice, I colored one of them with colored pencils, from the other I cut the frosting of the cupcake that I glittered with my new white crystal glitter (I´m loving this stuff!!!) and placed it with foam tape for dimension on the colored one, do you see the frosty effect? it´s so beautiful in real life! I wish I could take better pictures... Here is another angle picture so you can see Ratiny hidding behind
I decorated the cupcake with a flower and a button (from my stash also) and some heart stickers. I placed the image with foam tape on the envelope, hand wrote the sentiment with fine markers and voilá! very easy and finished in no time.

I´m playing with this envelope at the following challenges:
Lollipop Crafts Challenge #9: glitter, sparkle, gems
Aly´s Sunday Challenge #26: recipe (2 design paper + 2 buttons)
Little Red Wagon Challenge #47: glitter
Cupcake Crafts Chalennge #10: pink and brown
One stitch at a time Challenge#32: anything goes... as you like it!
Stamp, Scraps and Doodle: stitching
Sentimental Sundays Challenge #22: let´s see some dimension

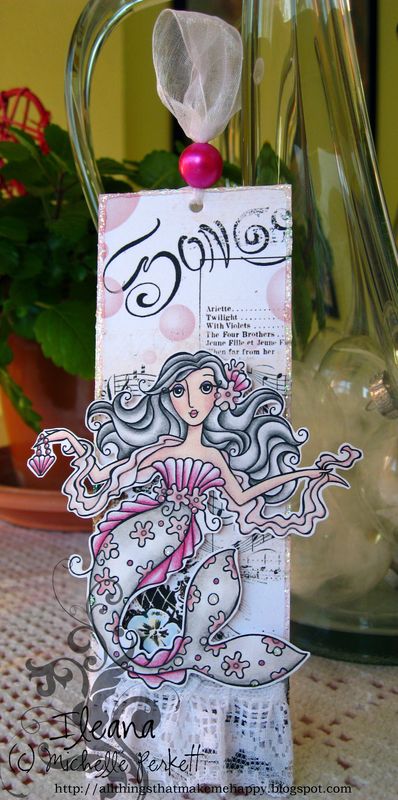
Mermaid song...

Michelle Perkett Studio Challenge blog this week is challenging us to use a tag on our projects, and they gave me the excuse to make this tag/bookmark using this gorgeous image: Eva the glam mermaid by Michelle Perkett.
I colored the image with colored pencils blended with gamsol and added dots of crystal glitter on some of the pearls of her "dress". I placed the image on the tag with foam tape for dimension.
The paper I used is from a very talented lady Julia van der Werf, I cut it in half and glued each one on each side of the tag, so I have the same paper on the back where I left a place to write a personalized sentiment. I added  a ruffled lace ribbon, made a hole on the top, tied a piece of sheer ribbon with a big pink bead (all from my stash) through it and finished the tag with crystal glitter glue.
A very easy, quick and simple one! hope you like it!!
I´m playing with this tag at:
Michelle Perkett Studio Challenge #46: tag you´re it!
Creative Inspirations Challenge #43: pink and black
Totally Paper Crafts Challenge #35: a kind of magic
Little Red Wagon Challenge #47: glitter
Allsorts Challenge #71: plain and simple

Back to school!

That time of the year again!! Loved all my first days of school, even at college they were special to me, all the expectation, new pencils, new notebook pads, sometimes new friends, new teachers, new things to learn... I made this card for my daughter´s first day of school, I hope she likes it! I´m also preparing some other goodies for her to open after school, I´ll show them as I finish them.
I took a plain craft card and rounded the corners, then I followed Clean & Simple sketch #101 (I used it before here), after that I rummaged my stash of scraps and found those I used to make last year´s first day of school card too, but I still like them a lot so I decided to use them again. Paper and row of pencils are part of a blog train I followed last year (couldn´t find the files to give credit of them). And slowly the sketch turned into a pencil box (not my original idea at all!!). Took a strip of craft paper and cut with edge scissors, I added some rhinestones to glitter it up a bit and hand wrote back to school! with gel pen. To make the shadows around the box and pencils I used my dark brown make up that I rarely use on me because is too dark for my skin... love the effect here.
The image I used is Mary Margaret, teacher´s pet from Michelle Perkett (her Etsy shop here) that I colored with colored pencils (and only blend them on the skin parts with mineral oil), I cut Mary and place her on the card with foam tape, to finish it I added a rhinestone on her bow.
Pretty simple but I like the result, hope you like it too! I´m participating at:
Michelle Perkett Studio challenge #42: back to school
Little Red Wagon challenge #43: back to school theme